Monday, 18 June 2018

Plan Your Oracle Mobile Cloud Instance

Oracle Mobile Cloud Service
MCS is a cloud-based service that provides a unified hub for developing, deploying, maintaining, monitoring, and analyzing your mobile apps and the resources that they rely on.
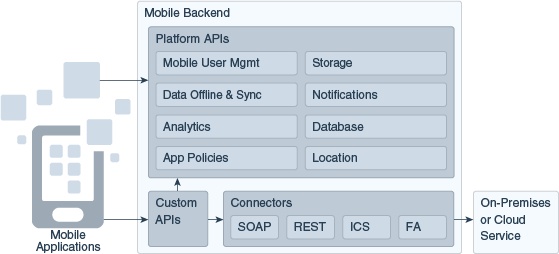


Your entry point into MCS depends on your role in your team’s mobile project.
If you are a mobile app developer, you use MCS to line up and test the resources you need for your apps to work. This includes selecting from MCS platform APIs and custom APIs and collaborating with other team members to create new custom APIs.
If you are a service developer, you write Node.js-based JavaScript code to implement the custom APIs required by the mobile app developers on your team. You might also find yourself collaborating with mobile app developers to fine-tune API designs and creating connector APIs to connect to enterprise systems.
If you are the team’s enterprise architect, you establish where desired data and functionality will come from, security and environment policies, and the roles and permissions of team members.
If you are the team’s mobile program manager, you use the Analytics features to track usage patterns.
If you are a mobile cloud administrator, you work within the Administration tab to monitor the services in production, use the Diagnostics features to drill down and pinpoint problems, and handle other admin tasks such as the adding and removing of users.


Plan Your OMCe Instance


Before you begin setting up an Oracle Mobile Cloud Enterprise(OMCe) instance, you should think about what you are going to use OMCe for and make a number of decisions, such as whether you need a database with Enterprise or High Performance packaging.
When you start to plan your OMCe instance, these are some of the things to consider:
  • Do you want the full OMCe stack, which includes Bots and Analytics, or do you want a Bots-only stack? If you only want to work with Bots, you can create the instance using the Bots-only template.
  • Are you are trying out OMCe to produce pilot applications or as proof of concept, or are you setting up a production environment? The database and OCPU requirements are different for each.
  • How are you going to manage the conversation history that Bots will be writing to the database over time? Do you have a plan to archive and purge the data so that database limits aren’t breached. See Archive and Purge Bots Data.
Provisioning the Database for OMCe for Proof of Concept
If you want to try out OMCe and examine the features available and understand the concepts, and perhaps develop some trial applications, you can use these recommendations.
For a full OMCe stack you need:
  • DB requirements (type and OCPU): Enterprise Package minimum
  • OCPU for Oracle Event Hub Cloud Service: 1 for each environment
  • OCPU for Oracle Big Data Cloud Service: 2 for each environment
For Bots-only you need:
  • DB requirements (type and OCPU): Standard Package minimum
  • OCPU for Oracle Event Hub Cloud Service: 1 for each environment
Provisioning the Database for a Production OMCe Environment
When you are confident that you want to create an OMCe environment suitable for a production environment, use these recommendations.
For a full OMCe stack you need:
  • DB requirements (type and OCPU): Enterprise Package minimum, although if you’re planning to work with larger sets of analytics data then you should ensure that you start with a High Performance database that can handle analytics queries across larger data sets.
  • OCPU for Oracle Event Hub Cloud Service: 1 for each environment
  • OCPU for Oracle Big Data Cloud Service: 2 for each environment
For Bots-only you need:
  • DB requirements (type and OCPU): Enterprise Package minimum
  • OCPU for Oracle Event Hub Cloud Service: 1 for each environment

Logging In to Oracle Cloud Services

You use the Oracle Cloud MyServices applications dashboard to create and manage the OMCe stack and the services associated with it.
To log in:
  1. In the email with the subject, Your Oracle Cloud Services Are Ready - Get Started Now, click the My Services Administration link. This is the one that starts with https://myservices-cacct-….
  2. Sign in using the credentials in the email with the subject Welcome to Oracle Cloud – Infrastructure and Platform Free Promotion. If this is the first time you have signed in, you must set up a new password and the new password must match the password criteria that you’ll see listed.
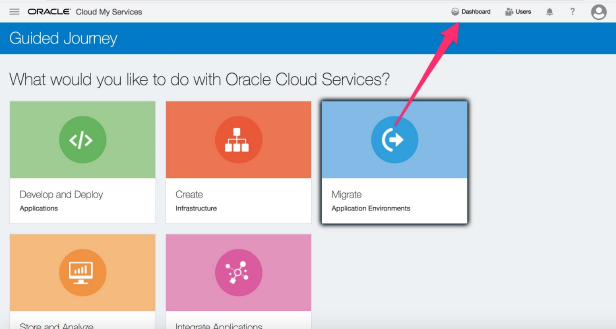
The first time that you log in, you are taken to the Guided Journey page, which lets you explore different Oracle Cloud Services. Because you know you want to provision Oracle Mobile Cloud Enterprise, you can ignore the Guided Journey for now and click Dashboard in the header to access the MyServices dashboard.
Do These Tasks First

Before you begin setting up an Oracle Mobile Cloud Enterprise (OMCe) instance, you have to provision the database and storage instances and carry out a few other tasks.
Important:
There are some tasks you must perform before you can create an OMCe stack:
  1. If this is the first time you've created a service on Oracle Public Cloud, choose a georeplication policy.
  2. Create a Storage Service admin user.
  3. Provision Database Cloud Service, if needed.
Important Pre-Provisioning Tasks
Use this workflow as a guide to perform the tasks you must carry out before you can create and provision OMCe.
TaskDescription
Set a georeplication policy for the storage service instanceIf this is a new Cloud account and you’ve never set up a service, you must select a georeplication policy. If you’ve already set up at least one service, you can skip ahead to provisioning the database. Choose a georeplication policy that defines your primary data center and also specifies that your data should be replicated to a geographically distant (secondary) data center. See Selecting a Georeplication Policy for Your Storage Service Instance
Create a storage service admin user and update storage container settingsCreate a Storage Service admin user for all the services you create. See Creating a Storage Service Admin User and Update Settings for the Storage Container
Create a database service and a storage serviceFrom the Oracle Cloud My Services application, create a database service and specify the storage service to be used for backup. See Provisioning the Database Cloud Service
After you have carried out these tasks, the next step is to create the OMCe stack.

Selecting a Georeplication Policy for Your Storage Service Instance

If this is a brand new Cloud account and you’ve never set up a service, you must select a georeplication policy.
About Georeplication
You must choose a georeplication policy that defines your primary data center—which you can find in your Welcome email—and also specifies that your data should be replicated to a geographically distant (secondary) data center. Data is written to the primary data center and replicated asynchronously to the secondary data center. In addition to being billed for storage capacity used at each data center, you’ll also be billed for bandwidth used during replication between data centers.
Note:
Once you select a replication policy, you can’t change it, so select your policy carefully.
Selecting a Georeplication Policy
  1. From the MyServices page, first select Customize Dashboard, then select Show for the Storage Classic service:
  2. On the Dashboard, look for Storage Classic, and from actions menu select Open Service Console.
    This takes you to the Storage Services console. If you haven’t set a georeplication policy yet, you will be prompted to do so.
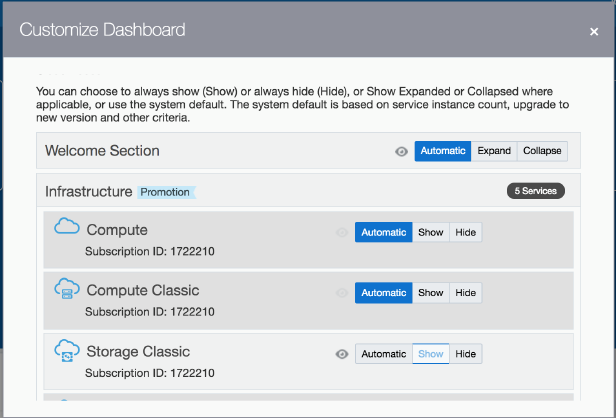
    Description of customize-dashboard.png follows
    Description of the illustration customize-dashboard.png
    For trials, the default value is sufficient. For paying accounts, see About Replication Policy for Your Account in Using Oracle Cloud Infrastructure Object Storage Classic for an explanation of the policies. You may not see all the policies described in the documentation, as availability is based on account type and service location. Selecting a policy can be confusing, but the main decision point is whether you need data replication (replication of files between data centers in the same region) or not. Only the policies that are available for your account type and service location are shown.
    Choose the replication policy based on your needs.
  3. When you see the Storage Classic overview page, you’ve finished this procedure.
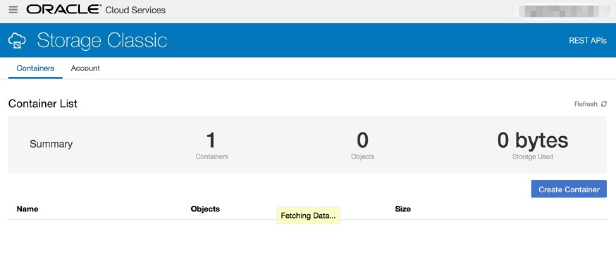
    Description of storage-overview.png follows
    Description of the illustration storage-overview.png
At a later date, you can see the georeplication policy that’s selected for your storage service instance. Sign in to the MyServices Dashboard. Expand Account Information. The details of your account are displayed in the Account Information pane. Look for the Georeplication Policy field.

Creating a Storage Service Admin User

Because storage service admin credentials are requested every time a service needs to access storage, we recommend that you create a dedicated storage admin to use across all services. The admin user’s credential is accessed very frequently—in fact, any time any service needs to access storage, the credential is required to authenticate. The credential (token) is also cached, so if you change this user’s password, storage access will actually fail, and the account will be locked.
WARNING:
After you use this storage admin user to create a service, do not change the password! Doing so will lead to runtime failures for these services.
To create a dedicated storage service admin user:
  1. Click Users on the upper right corner of the MyServices Dashboard:

    Description of users-link.png follows
    Description of the illustration users-link.png
  2. On the Dashboard, look for Storage Classic, and from actions menu select Open Service Console.
    This takes you to the Storage Services console. If you haven’t set a georeplication policy yet, you will be prompted to do so.
  3. In the User Management page, click Identity Console.
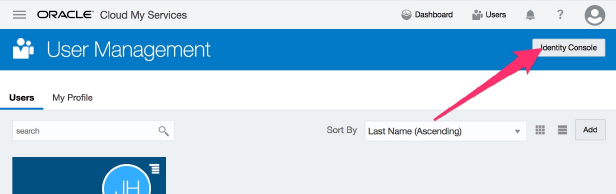
    Description of user-management-page.png follows
    Description of the illustration user-management-page.png
  4. On the Identity Console’s User tab, click Add.
  5. Fill out the User Details. You need to use a different email address from your admin ID. Click Finish when complete.
  6. Click the Applications tab.
  7. In the search box, type Storage, then click Enter.
    You should now see the Storage service entry.
  8. Click the storage service entry, then click the Application Roles tab.
  9. Click the hamburger icon in the Storage_Administrator role entry, then click Assign Users:
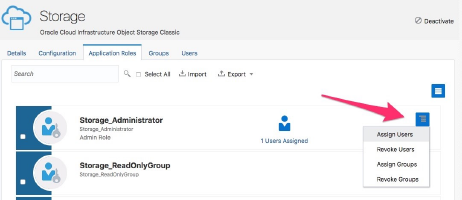
    Description of assign-users.png follows
    Description of the illustration assign-users.png
  10. Select the checkbox next to the newly created user, and click Assign.
    The new user is assigned the Storage Service administrator role, and they will receive an email with instructions to activate the account. Make sure the account is activated before you proceed. You can test this by simply logging in using this account.
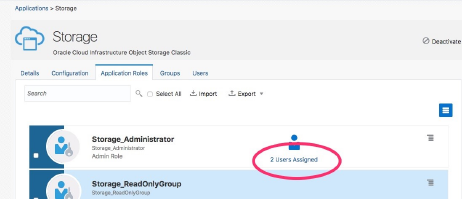
    Description of assigned-roles.png follows
    Description of the illustration assigned-roles.png

Update Settings for the Storage Container

After you create the OMCe stack you must run commands to set the replication policy for storage account and set the storage container to allow anonymous read.
Use the cURL command-line tool to run commands to update settings for the storage container.
Install cURL
These steps describe the procedure on a Windows 64-bit system.
  1. In your browser, navigate to the cURL home page at http://curl.haxx.se and click Download in the left navigation menu.
  2. On the cURL Releases and Downloads page, locate the SSL-enabled version of the cURL software that corresponds to your operating system, click the link to download the ZIP file, and install the software.
  3. Navigate to the cURL CA Certs page at http://curl.haxx.se/docs/caextract.html and download the ca-bundle.crt SSL CA certificate bundle in the folder where you installed cURL.
  4. Open a command window, navigate to the directory where you installed cURL, and set the cURL environment variable, CURL_CA_BUNDLE, to the location of an SSL certificate authority (CA) certificate bundle. For example:
    C:\curl> set CURL_CA_BUNDLE=ca-bundle.crt
There are four commands that need to be run. Run them in the order shown.
Storage Container - Setup Replication Policy
Run these commands to set the replication policy for storage account.
get token
curl -v -X GET -H 'X-Storage-User:Storage-<Cloud Account>:<User>' -H 'X-Storage-Pass:<Password>' <Storage URL>/auth/v1.0
Example
curl -v -X GET -H 'X-Storage-User: Storage-mjondcm208:mary.jones@greencorp.com' -H 'X-Storage-Pass: welcome1' https://foo.storage.oraclecloud.com/auth/v1.0
set policy
curl -v -X POST -H 'X-Auth-Token: <AUTH_Token>' -H 'X-Account-Meta-Policy-Georeplication: <Data Center>' <Storage URL> /v1/Storage-<Cloud Account>
Example
curl -v -X POST  -H 'X-Auth-Token:AUTH_tka2f992ca45781566f48f7e7332a92c77' -H 'X-Account-Meta-Policy-Georeplication: dc1' https://foo.storage.oraclecloud.com/MyService-bar
Storage Container - Set Anonymous Read
The storage container needs to set the anonymous read flag
set read flag
curl -v -X POST -H 'X-Auth-Token: <AUTH_Token>' -H 'X-Container-Read: .r:*,.rlistings' <Storage URL> /v1/Storage-<Cloud Account>
Example
curl -v -X POST  -H 'X-Auth-Token:AUTH_tka2f992ca45781566f48f7e7332a92c77' -H 'X-Container-Read: .r:*,.rlistings' https://foo.storage.oraclecloud.com/MyService-bar

Provisioning the Database Cloud Service

If you have already provisioned a Database Cloud Service and wish to use the same instance for OMCe, skip ahead to Set Up the OMCe Service. You’ll need to supply some database-related details when you get to the OMCe provisioning step, so make sure you have that information handy.
Database Cloud Service creation typically takes 1 to 2 hours.
  1. Go to the MyServices dashboard.
  2. Click Create Instance.
  3. Click the Create button next to Database.
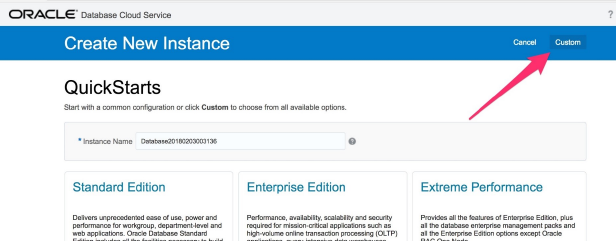
  4. On the QuickStarts page, click Custom in the upper right corner to create a Database Cloud Service with custom configuration:

  1. In the Create Instance dialog, fill in the provisioning configuration details:
    1. Service Name: Name of the DBCS instance you’re creating. Choose a name that reflects its usage. The name has to be unique. It can be up to 50 characters, although it’s best to use a short name. It must start with a letter, and can contain only letters, numbers and hyphens (-). It cannot end with a hyphen (-).
    2. Description: Enter the purpose of this DBCS instance.
    3. Notification Email: This is the email account receiving DBCS instances event notifications. Enter the Admin’s email address.
    4. Region: This is the data center/region of the DBCS instance. See About Replication Policy for Your Account in Using Oracle Cloud Infrastructure Object Storage Classic for a mapping between data center code (e.g. uscom-central-1) and the actual location. The Region list contains only a subset of all data center codes. Select the data center location based on what you set up in the georeplication policy.
      Note:
      When you provision OMCe, you must select the same region that you select here.
    5. Bring Your Own License: If you are setting up a trial environment, select this to help save free trial credits.
      You may activate the Bring Your Own License (BYOL) version of OMCe and you will be charged the BYOL rate for the activated OMCe provided that you have sufficient supported on-premises licenses as required and specified in the Service Description for Oracle PaaS. See Overview of Oracle Cloud Subscriptions in Getting Started with Oracle Cloud.
    6. Software Release: The version of DBCS. Select Oracle Database 12c Release 2. Do not accept the default value.
    7. Software Edition: The edition of DBCS. Choose either Enterprise Edition - Enterprise or Enterprise Edition – High Performance. For most situations, an Enterprise Edition database is sufficient. High Performance Edition is recommended only if:
      • You plan to use Mobile/Bot Customer Analytics features, and
      • There will be a large amount of historical data.
    8. Database Type: Leave as the default Single Instance.
  2. Click Next and fill in database configuration information:
    1. DB Name: Enter a name for the DB instance.
    2. PDB Name: The name of the PDB. Use the default value.
    3. Administration Password and Confirm Password: The password for SYS and SYSTEM database users, the admin Oracle GlassFish Server user, and the admin Oracle Application Express user.
      Note:
      The password must be alpha numeric and can contain the special characters $, # , _. However, the password must not start with a special character or a number, otherwise provisioning of some services will fail.
    4. Usable Database Storage: For OMCe, the storage service uses DB Storage, as they are stored as BLOBs. Leave as the default of 25GB.
    5. Compute Shape: The amount of resources allocated to this DBCS instance. See Classic Compute Shapes Available.
      Use the default, OC3.
    6. SSH Public Key: The public and private key pairs to use for DBCS SSH access. If you created a key pair previously, you can use it.
      To create a new public and private key pair:
      1. Click Edit, then Create a New Key. A public and private key pair are created.
      2. Click Download to download the key. Save the key for later use.
      3. Enter the public key in SSH Public Key.
  3. Provide the information for backup and recovery:
    1. Backup Destination: The destination of the DBCS backup. Select Cloud Storage Only.
    2. Cloud Storage Container: Use the default value for the Cloud Storage Container name for your service instance backups. It has the format https://<account_name>.<country>.storage.oraclecloud.com/v1/Storage-<account_name>/DBaaS-DBname, where DBaaS-DBname is the container name. If you are recreating an OMCe stack, use a new container name.
      The container name must consist of UTF-8 characters only. The name can start with any character and can’t exceed 1061 bytes. Don’t include a slash (/), angled brackets (<>) , or strings (/../) in the name.
    3. User Name: This is the Storage Cloud Service Admin ID. Use the storage service user ID created in Creating a Storage Service Admin User. Do not use a real user’s ID.
    4. Password: Use the password for the storage service admin user.
    5. Create Cloud Storage Container: Select this to create the Cloud Storage Container.
  4. Specify whether to initialize data from backup.
    Create Instance from Existing Backup: Specify whether the instance should be created from an existing backup. Choose No, unless you are really restoring from a previously DBCS instance.
  5. Click Next and review the information you provided.
  6. Click Create to kick off the database creation process.
    On the Database Cloud Service page, you’ll see your new database instance listed. When you see Creating instance …, you know that DBCS provisioning is taking place. DBCS creation typically takes 1-2 hours.
Once provisioned, you will see the service overview for DBCS. It should be started and ready to go.
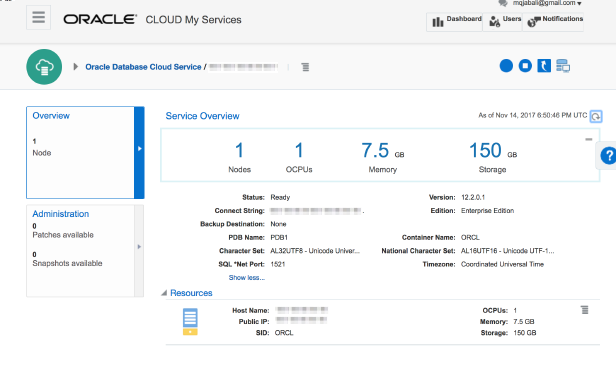
Description of dbcs-overview.png follows
Description of the illustration dbcs-overview.png

Saturday, 16 June 2018

RESTful API with Node.js on Oracle Application Container Cloud

Oracle Application Container Cloud Service: Building a RESTful API with Node.js and Express

Purpose

This tutorial shows you how to develop a RESTful API in Node.js using the Express framework and an Oracle Database Cloud Service instance to deploy it in Oracle Application Container Cloud Service.

This article describes how a simple Node.js application is configured for deployment on the Oracle Application Container Cloud and how it leverages the node-oracledb database driver that allows Node.js applications to easily connect to an Oracle Database. From the Application Container Cloud, the application discussed uses a cloud Service Binding to access a DBaaS instance also running on the Oracle Public Cloud. The Node.js application returns a JSON message containing details about employee in the EMPLOYEE table in the HR schema of the DBaaS instance. The Node.js application itself is very rudimentary. The way it handles the HTTP requests is quite simplistic. It does not leverage most common practices in Node.js or JavaScript. It does not handle bind parameters in the queries nor does it interpret URL path parameters or query parameters.

Time to Complete

45 minutes

Background

Express is a Node.js web application framework that provides a robust set of features to develop web and mobile applications. It facilitates a rapid development of Node based Web applications.

Scenario

In this tutorial, you build a basic RESTful API that implements the CRUD (Create, Read, Update, and Delete) operations on an employee table in a Oracle Database Cloud Service instance using plain Node.js and the Express framework.
The Node.js RESTful application responds to the following endpoints:
PathDescription
GET: /employeesGets all the employees.
GET: /employees/{searchType}/{searchValue}Gets the employees that match the search criteria.
POST: /employeesAdds an employee.
PUT: /employees/{id}Updates an employee.
DELETE: /employees/{id}Removes an employee.
Copy the following script into the SQL worksheet to create the EMPLOYEE table and the sequence named EMPLOYEE_SEQ:
CREATE TABLE EMPLOYEE (
      ID INTEGER NOT NULL,
      FIRSTNAME VARCHAR(255),
      LASTNAME VARCHAR(255),
      EMAIL VARCHAR(255),
      PHONE VARCHAR(255),
      BIRTHDATE VARCHAR(10),
      TITLE VARCHAR(255),
      DEPARTMENT VARCHAR(255),
      PRIMARY KEY (ID)
   ); 


CREATE SEQUENCE EMPLOYEE_SEQ
 START WITH     100
 INCREMENT BY   1; 


  1. Click Run Script.
    SQL Worksheet - Run Statement
    Description of this image
  2. Click Commit.
    SQL Worksheet - Commit
    Description of this image
  3. Copy the following script into the SQL worksheet to insert five employees, click Run Script, and then click Commit.
    INSERT INTO EMPLOYEE (ID, FIRSTNAME, LASTNAME, EMAIL, PHONE, BIRTHDATE, TITLE, DEPARTMENT) VALUES (EMPLOYEE_SEQ.nextVal, 'Hugh', 'Jast', 'Hugh.Jast@example.com', '730-715-4446', '1970-11-28' , 'National Data Strategist', 'Mobility'); 
    INSERT INTO EMPLOYEE (ID, FIRSTNAME, LASTNAME, EMAIL, PHONE, BIRTHDATE, TITLE, DEPARTMENT) VALUES (EMPLOYEE_SEQ.nextVal, 'Toy', 'Herzog', 'Toy.Herzog@example.com', '769-569-1789','1961-08-08', 'Dynamic Operations Manager', 'Paradigm'); 
    INSERT INTO EMPLOYEE (ID, FIRSTNAME, LASTNAME, EMAIL, PHONE, BIRTHDATE, TITLE, DEPARTMENT) VALUES (EMPLOYEE_SEQ.nextVal, 'Reed', 'Hahn', 'Reed.Hahn@example.com', '429-071-2018', '1977-02-05', 'Future Directives Facilitator', 'Quality'); 
    INSERT INTO EMPLOYEE (ID, FIRSTNAME, LASTNAME, EMAIL, PHONE, BIRTHDATE, TITLE, DEPARTMENT) VALUES (EMPLOYEE_SEQ.nextVal, 'Novella', 'Bahringer', 'Novella.Bahringer@example.com', '293-596-3547', '1961-07-25' , 'Principal Factors Architect', 'Division'); 
    INSERT INTO EMPLOYEE (ID, FIRSTNAME, LASTNAME, EMAIL, PHONE, BIRTHDATE, TITLE, DEPARTMENT) VALUES (EMPLOYEE_SEQ.nextVal, 'Zora', 'Sawayn', 'Zora.Sawayn@example.com', '923-814-0502', '1978-03-18' , 'Dynamic Marketing Designer', 'Security'); 
 

Developing the REST Server

In this section, you create the REST Service and you use the NPM utility to download and build dependencies for your Node.js project.
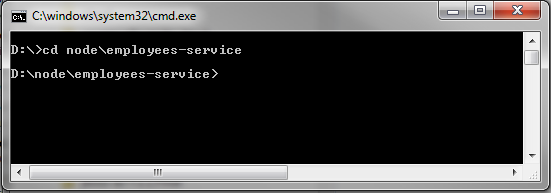
  1. Open a console window and go to the folder where you want to store the Node.js application server.
    Console window - open folder
    Description of this image
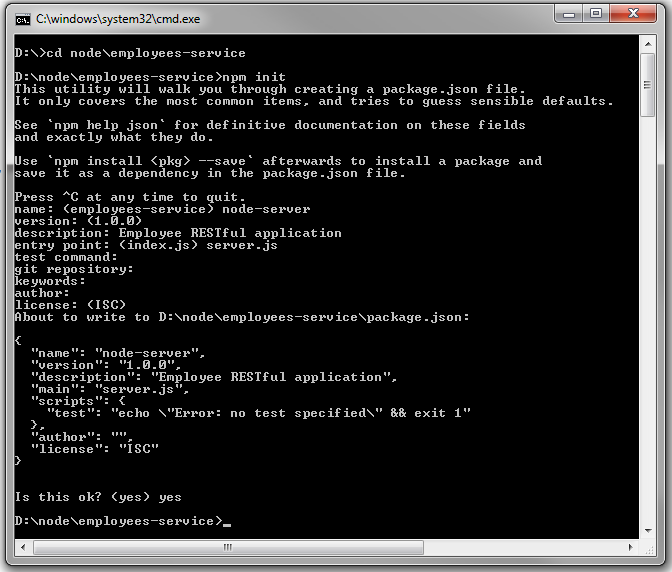
  2. Run npm init to create the package.json file. At the prompt, enter the following values, confirm the values, and then press Enter:
    • Name: node-server
    • Version: 1.0.0 (or press Enter.)
    • Description: Employee RESTful application
    • Entry point: server.js
    • Test command (Press Enter.)
    • Git repository (Press Enter.)
    • Keywords (Press Enter.)
    • Author (Enter your name or email address.)
    • License (Press Enter.)
    Console window – create package.json
    Description of this image
    The package.json file is created and stored in the current folder. You can open it and modify it, if needed.
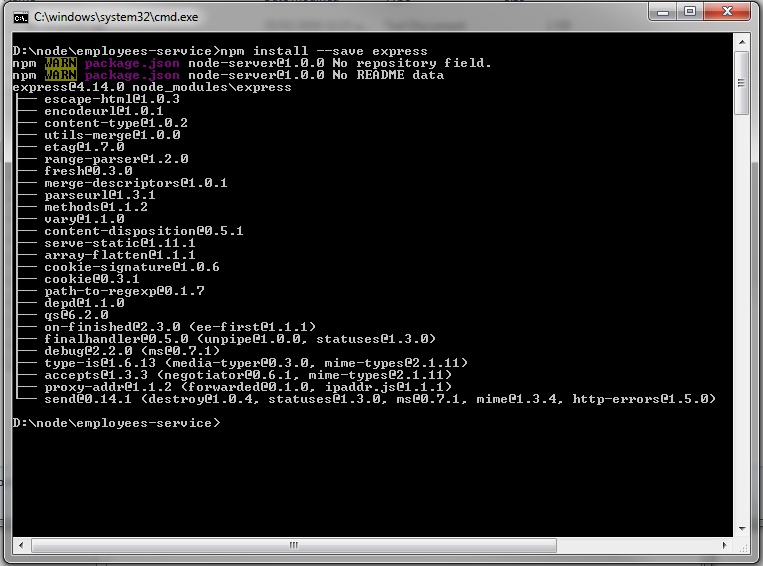
  3. In the console window, download, build, and add the Express framework dependency:
    npm install --save express
    Console window - add Express framework dependency
    Description of this image
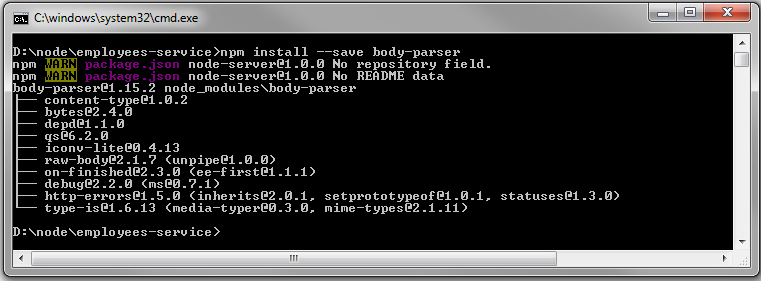
  4. In the console window, install the body-parser dependency:
    npm install --save body-parser
    The body-parser dependency is a Node.js middleware for handling JSON, Raw, Text and URL encoded form data.
    Console window - install body-parse dependency
    Description of this image
    Note: If the console displays optional, dep failed or continuing output, ignore it. The output pertains to warnings or errors caused by dependencies on native binaries that couldn't be built. The libraries being used often have a JavaScript fallback node library, and native binaries are used only to optimize performance.
  5. Open the generated package.json file in a text editor, and verify its contents. It should look like this:

    {
      "name": "node-server",
      "version": "1.0.0",
      "description": "Employee RESTful application",
      "main": "server.js",
      "scripts": {
        "test": "echo \"Error: no test specified\" && exit 1",
        "start": "node server.js"
      },
      "author": "",
      "license": "ISC",
      "dependencies": {
        "body-parser": "^1.14.1",
        "express": "^4.13.3"
      }
    }
  6. Create a server.js file, open it in a text editor, and add the following require statements to use the node dependencies and the oracledb server component:
    var express = require('express');
    var bodyParser = require('body-parser');
    var oracledb = require('oracledb');
  7. Add a PORT variable equal either to the process.env.PORT environment variable or to 8089, if the environment variable isn't set:
    The PORT environment variable is set automatically by Oracle Application Container Cloud Service.
    var PORT = process.env.PORT || 8089;
  8. Create an app variable to use the express method:
    var app = express();
  9. Store the database connection properties that are equal to environment variables or defaults:
    The environment variables listed are set in Oracle Application Container Cloud Service automatically when you add the Database Cloud Service binding.
    var connectionProperties = {
      user: process.env.DBAAS_USER_NAME || "oracle",
      password: process.env.DBAAS_USER_PASSWORD || "oracle",
      connectString: process.env.DBAAS_DEFAULT_CONNECT_DESCRIPTOR || "localhost/xe"
    };
  10. Create the doRelease method to release the database connection:
    function doRelease(connection) {
      connection.release(function (err) {
        if (err) {
          console.error(err.message);
        }
      });
    }
  11. Configure your application to use bodyParser(), so that you can get the data from a POST request:
    // configure app to use bodyParser()
    // this will let us get the data from a POST
    app.use(bodyParser.urlencoded({ extended: true }));
    app.use(bodyParser.json({ type: '*/*' }));
  12. Create a router object and assign it to the router variable:
    var router = express.Router();
  13. Add the following response headers to support calls from external clients:
    Note: Browsers and applications usually prevent calling REST services from different sources. If you run the client on Server A and the REST services on Server B, then you must provide a list of known clients in Server B by using the Access-Control headers. Clients check these headers to allow invocation of a service and prevent cross-site scripting attacks (XSS).
    router.use(function (request, response, next) {
      console.log("REQUEST:" + request.method + "   " + request.url);
      console.log("BODY:" + JSON.stringify(request.body));
      response.setHeader('Access-Control-Allow-Origin', '*');
      response.setHeader('Access-Control-Allow-Methods', 'GET, POST, OPTIONS, PUT, PATCH, DELETE');
      response.setHeader('Access-Control-Allow-Headers', 'X-Requested-With,content-type');
      response.setHeader('Access-Control-Allow-Credentials', true);
      next();
    });
  14. Create the GET method to get the list of employees:

    /**
     * GET / 
     * Returns a list of employees 
     */
    router.route('/employees/').get(function (request, response) {
      console.log("GET EMPLOYEES");
      oracledb.getConnection(connectionProperties, function (err, connection) {
        if (err) {
          console.error(err.message);
          response.status(500).send("Error connecting to DB");
          return;
        }
        console.log("After connection");
        connection.execute("SELECT * FROM employee",{},
          { outFormat: oracledb.OBJECT },
          function (err, result) {
            if (err) {
              console.error(err.message);
              response.status(500).send("Error getting data from DB");
              doRelease(connection);
              return;
            }
            console.log("RESULTSET:" + JSON.stringify(result));
            var employees = [];
            result.rows.forEach(function (element) {
              employees.push({ id: element.ID, firstName: element.FIRSTNAME, 
                               lastName: element.LASTNAME, email: element.EMAIL, 
                               phone: element.PHONE, birthDate: element.BIRTHDATE, 
                               title: element.TITLE, dept: element.DEPARTMENT });
            }, this);
            response.json(employees);
            doRelease(connection);
          });
      });
    });
  15. Create the GET method to return the list of employees that match the criteria.
    /**
     * GET /searchType/searchValue 
     * Returns a list of employees that match the criteria 
     */
    router.route('/employees/:searchType/:searchValue').get(function (request, response) {
      console.log("GET EMPLOYEES BY CRITERIA");
      oracledb.getConnection(connectionProperties, function (err, connection) {
        if (err) {
          console.error(err.message);
          response.status(500).send("Error connecting to DB");
          return;
        }
     console.log("After connection");
     var searchType = request.params.searchType;
     var searchValue = request.params.searchValue;
       
        connection.execute("SELECT * FROM employee WHERE "+searchType+" = :searchValue",[searchValue],
          { outFormat: oracledb.OBJECT },
          function (err, result) {
            if (err) {
              console.error(err.message);
              response.status(500).send("Error getting data from DB");
              doRelease(connection);
              return;
            }
            console.log("RESULTSET:" + JSON.stringify(result));
            var employees = [];
            result.rows.forEach(function (element) {
              employees.push({ id: element.ID, firstName: element.FIRSTNAME, 
                         lastName: element.LASTNAME, email: element.EMAIL, 
                         phone: element.PHONE, birthDate: element.BIRTHDATE, 
             title: element.TITLE, dept: element.DEPARTMENT });
            }, this);
            response.json(employees);
            doRelease(connection);
          });
      });
    }); 
  16. Create the POST method to add employees:

    /**
     * POST / 
     * Saves a new employee 
     */
    router.route('/employees/').post(function (request, response) {
      console.log("POST EMPLOYEE:");
      oracledb.getConnection(connectionProperties, function (err, connection) {
        if (err) {
          console.error(err.message);
          response.status(500).send("Error connecting to DB");
          return;
        }
    
        var body = request.body;
    
        connection.execute("INSERT INTO EMPLOYEE (ID, FIRSTNAME, LASTNAME, EMAIL, PHONE, BIRTHDATE, TITLE, DEPARTMENT)"+ 
                           "VALUES(EMPLOYEE_SEQ.NEXTVAL, :firstName,:lastName,:email,:phone,:birthdate,:title,:department)",
          [body.firstName, body.lastName, body.email, body.phone, body.birthDate, body.title,  body.dept],
          function (err, result) {
            if (err) {
              console.error(err.message);
              response.status(500).send("Error saving employee to DB");
              doRelease(connection);
              return;
            }
            response.end();
            doRelease(connection);
          });
      });
    });
  17. Create the PUT method to update the employee by ID:

    /**
     * PUT / 
     * Update a employee 
     */
    router.route('/employees/:id').put(function (request, response) {
      console.log("PUT EMPLOYEE:");
      oracledb.getConnection(connectionProperties, function (err, connection) {
        if (err) {
          console.error(err.message);
          response.status(500).send("Error connecting to DB");
          return;
        }
    
        var body = request.body;
        var id = request.params.id;
    
        connection.execute("UPDATE EMPLOYEE SET FIRSTNAME=:firstName, LASTNAME=:lastName, PHONE=:phone, BIRTHDATE=:birthdate,"+
                           " TITLE=:title, DEPARTMENT=:department, EMAIL=:email WHERE ID=:id",
          [body.firstName, body.lastName,body.phone, body.birthDate, body.title, body.dept, body.email,  id],
          function (err, result) {
            if (err) {
              console.error(err.message);
              response.status(500).send("Error updating employee to DB");
              doRelease(connection);
              return;
            }
            response.end();
            doRelease(connection);
          });
      });
    });
  18. Create the DELETE method to remove employees by ID:

    /**
     * DELETE / 
     * Delete a employee 
     */
    router.route('/employees/:id').delete(function (request, response) {
      console.log("DELETE EMPLOYEE ID:"+request.params.id);
      oracledb.getConnection(connectionProperties, function (err, connection) {
        if (err) {
          console.error(err.message);
          response.status(500).send("Error connecting to DB");
          return;
        }
    
        var body = request.body;
        var id = request.params.id;
        connection.execute("DELETE FROM EMPLOYEE WHERE ID = :id",
          [id],
          function (err, result) {
            if (err) {
              console.error(err.message);
              response.status(500).send("Error deleting employee to DB");
              doRelease(connection);
              return;
            }
            response.end();
            doRelease(connection);
          });
      });
    });
  19. Set up and start the server:
    app.use(express.static('static'));
    app.use('/', router);
    app.listen(PORT);
The completed server.js should look like this:
var express = require('express');
var app = express();
var bodyParser = require('body-parser');

var oracledb = require('oracledb');
oracledb.autoCommit = true;

var connectionProperties = {
  user: process.env.DBAAS_USER_NAME || "oracle",
  password: process.env.DBAAS_USER_PASSWORD || "oracle",
  connectString: process.env.DBAAS_DEFAULT_CONNECT_DESCRIPTOR || "129.152.132.76:1521/ORCL"
};

function doRelease(connection) {
  connection.release(function (err) {
    if (err) {
      console.error(err.message);
    }
  });
}

// configure app to use bodyParser()
// this will let us get the data from a POST
app.use(bodyParser.urlencoded({ extended: true }));
app.use(bodyParser.json({ type: '*/*' }));

var PORT = process.env.PORT || 8089;

var router = express.Router();

router.use(function (request, response, next) {
  console.log("REQUEST:" + request.method + "   " + request.url);
  console.log("BODY:" + JSON.stringify(request.body));
  response.setHeader('Access-Control-Allow-Origin', '*');
  response.setHeader('Access-Control-Allow-Methods', 'GET, POST, OPTIONS, PUT, PATCH, DELETE');
  response.setHeader('Access-Control-Allow-Headers', 'X-Requested-With,content-type');
  response.setHeader('Access-Control-Allow-Credentials', true);
  next();
});

/**
 * GET / 
 * Returns a list of employees 
 */
router.route('/employees/').get(function (request, response) {
  console.log("GET EMPLOYEES");
  oracledb.getConnection(connectionProperties, function (err, connection) {
    if (err) {
      console.error(err.message);
      response.status(500).send("Error connecting to DB");
      return;ins
    }
    console.log("After connection");
    connection.execute("SELECT * FROM employee",{},
      { outFormat: oracledb.OBJECT },
      function (err, result) {
        if (err) {
          console.error(err.message);
          response.status(500).send("Error getting data from DB");
          doRelease(connection);
          return;
        }
        console.log("RESULTSET:" + JSON.stringify(result));
        var employees = [];
        result.rows.forEach(function (element) {
          employees.push({ id: element.ID, firstName: element.FIRSTNAME, 
                           lastName: element.LASTNAME, email: element.EMAIL, 
                           phone: element.PHONE, birthDate: element.BIRTHDATE, 
                           title: element.TITLE, dept: element.DEPARTMENT });
        }, this);
        response.json(employees);
        doRelease(connection);
      });
  });
});

/**
 * GET /searchType/searchValue 
 * Returns a list of employees that match the criteria 
 */
router.route('/employees/:searchType/:searchValue').get(function (request, response) {
  console.log("GET EMPLOYEES BY CRITERIA");
  oracledb.getConnection(connectionProperties, function (err, connection) {
    if (err) {
      console.error(err.message);
      response.status(500).send("Error connecting to DB");
      return;
    }
    console.log("After connection");
    var searchType = request.params.searchType;
    var searchValue = request.params.searchValue;
      
    connection.execute("SELECT * FROM employee WHERE "+searchType+" = :searchValue",[searchValue],
      { outFormat: oracledb.OBJECT },
      function (err, result) {
        if (err) {
          console.error(err.message);
          response.status(500).send("Error getting data from DB");
          doRelease(connection);
          return;
        }
        console.log("RESULTSET:" + JSON.stringify(result));
        var employees = [];
        result.rows.forEach(function (element) {
          employees.push({ id: element.ID, firstName: element.FIRSTNAME, 
                           lastName: element.LASTNAME, email: element.EMAIL, 
                           phone: element.PHONE, birthDate: element.BIRTHDATE, 
                           title: element.TITLE, dept: element.DEPARTMENT });
        }, this);
        response.json(employees);
        doRelease(connection);
      });
  });
});

/**
 * POST / 
 * Saves a new employee 
 */
router.route('/employees/').post(function (request, response) {
  console.log("POST EMPLOYEE:");
  oracledb.getConnection(connectionProperties, function (err, connection) {
    if (err) {
      console.error(err.message);
      response.status(500).send("Error connecting to DB");
      return;
    }

    var body = request.body;

    connection.execute("INSERT INTO EMPLOYEE (ID, FIRSTNAME, LASTNAME, EMAIL, PHONE, BIRTHDATE, TITLE, DEPARTMENT)"+ 
                       "VALUES(EMPLOYEE_SEQ.NEXTVAL, :firstName,:lastName,:email,:phone,:birthdate,:title,:department)",
      [body.firstName, body.lastName, body.email, body.phone, body.birthDate, body.title,  body.dept],
      function (err, result) {
        if (err) {
          console.error(err.message);
          response.status(500).send("Error saving employee to DB");
          doRelease(connection);
          return;
        }
        response.end();
        doRelease(connection);
      });
  });
});

/**
 * PUT / 
 * Update a employee 
 */
router.route('/employees/:id').put(function (request, response) {
  console.log("PUT EMPLOYEE:");
  oracledb.getConnection(connectionProperties, function (err, connection) {
    if (err) {
      console.error(err.message);
      response.status(500).send("Error connecting to DB");
      return;
    }

    var body = request.body;
    var id = request.params.id;

    connection.execute("UPDATE EMPLOYEE SET FIRSTNAME=:firstName, LASTNAME=:lastName, PHONE=:phone, BIRTHDATE=:birthdate,"+
                       " TITLE=:title, DEPARTMENT=:department, EMAIL=:email WHERE ID=:id",
      [body.firstName, body.lastName,body.phone, body.birthDate, body.title, body.dept, body.email,  id],
      function (err, result) {
        if (err) {
          console.error(err.message);
          response.status(500).send("Error updating employee to DB");
          doRelease(connection);
          return;
        }
        response.end();
        doRelease(connection);
      });
  });
});


/**
 * DELETE / 
 * Delete a employee 
 */
router.route('/employees/:id').delete(function (request, response) {
  console.log("DELETE EMPLOYEE ID:"+request.params.id);
  oracledb.getConnection(connectionProperties, function (err, connection) {
    if (err) {
      console.error(err.message);
      response.status(500).send("Error connecting to DB");
      return;
    }

    var body = request.body;
    var id = request.params.id;
    connection.execute("DELETE FROM EMPLOYEE WHERE ID = :id",
      [id],
      function (err, result) {
        if (err) {
          console.error(err.message);
          response.status(500).send("Error deleting employee to DB");
          doRelease(connection);
          return;
        }
        response.end();
        doRelease(connection);
      });
  });
});

app.use(express.static('static'));
app.use('/', router);
app.listen(PORT);
                        

Preparing the Node.js Server Application for Cloud Deployment

To ensure that your server application runs correctly in the cloud, you must:
  • Bundle the application in a .zip file that includes all dependencies. 
    Note: Don't bundle database drivers for Oracle Enterprise Cloud Service.
  • Include a manifest.json file that specifies the command which Oracle Application Container Cloud Service should run.
  • Ensure your application listens to requests on a port provided by the PORT environment variable. Oracle Application Container Cloud Service uses this port to redirect requests made to your application.


Creating the manifest.json File

When you upload your application to Oracle Application Container Cloud Service using the user interface, you must include a file called manifest.json in the application archive (.zip, .tgz, .tar.gz file). If you use the REST API to upload the application, this file is still required but doesn’t have to be in the archive.
  1. Create a manifest.json file.
  2. Open the manifest.json file in a text editor and add the following content:
    {
      "runtime":{
        "majorVersion":"8"
      },
      "command": "node server.js",
      "release": {},
      "notes": ""
    }
    The manifest.json file contains the target platform and the command to be run.
  3. Compress all the project files including the manifest.json file and the node_modules folder in a file named node-app-db.zip. Make sure that the node_modules folder doesn't have an OracleDB subfolder.

Deploying the Application to Oracle Application Container Cloud Service


To deploy the application to Oracle Application Container Cloud Service, use the node-app-db.zip file that you created in the previous section.
  1. Log in to Oracle Cloud at http://cloud.oracle.com/. Enter the identity domain, user name, and password for your account.
    Oracle Cloud login page
    Description of this image
  2. Click Service Console to open the Oracle Application Container Cloud Service console.
    Instance of Oracle Application Container Cloud Service
    Description of this image
  3. In the Applications list view, click Create Application and select Node.
    Oracle Application Container Cloud Service home
    Description of this image
  4. In the Application section, enter a name for your application, select Upload application archive, and click Browse.
    Create Application dialog box
    Description of this image
  5. On the File Upload page, select the node-app-db.zip file, and click Open. After a short delay, the application is verified.
    File Upload dialog box
    Description of this image
  6. In the Application section, enter Simple Rest Service that implements HTTP POST and HTTP Get methods in the Notes field and click Create.
    Create Application dialog box
    Description of this image
  7. When the confirmation dialog box is displayed, click OK.
    Confirmation dialog box
    Description of this image
    Your application could take a few minutes to deploy.

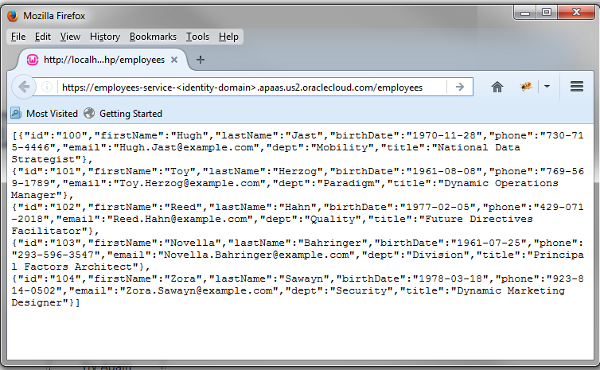
Testing the REST service

  1. Open a web browser and enter the URL of the employee REST service.
    Note: Replace identity-domain with the entity domain of your cloud account.
    URL:
    https://employees-service-identity-domain.apaas.us2.oraclecloud.com/employees
    Firefox window - Employees Service
Note: If you would like to test your on service over the local machine then You need to follow below steps to run the same code over the machine.

  • Install Oracledb driver where your folder is reside.
Command to install Oracle driver:  npm install oracledb
  • Set the Instantclient path inside the enviroment variable. Before setting the path you need to download the oracle instant client from oracle site and extract to the any folder where you want to run your application.


  • Now Run your application. Node server.js

Additional information:  Code to know the server address where your application is hosted over the local machine. You need to just add the code in the end to know the details of the server.


var server = app.listen(3000, function () {

    "use strict";


var host = server.address().address,
        port = server.address().port;

    console.log(' Server is listening at http://%s:%s', host, port);
});

After adding this 5 line code. Just run the script.